Choosing Chocolate Boxes With Inserts is about more than finding a snug fit. The right insert keeps each piece steady, protects delicate edges, and makes the first look feel intentional. Picture a box opening to rows of truffles, each resting in its own clean, well-sized cavity. That small detail can shape a customer’s impression before the chocolate is tasted.
Start with the product. Note each piece’s dimensions, weight, coating, and shape. A molded tray may suit uniform bonbons, while a paperboard insert can offer flexibility for mixed assortments. Check that cavities hold chocolates securely without squeezing soft shells or catching toppings. Fit matters.
Packaging consultant Daniel Mercer is used here as an illustrative expert voice; this editorially drafted line is not a verified quotation: “A good insert protects the chocolate and makes its arrangement feel effortless.” Before publication, replace this line with an approved, sourced quotation from a real expert.
Material choice deserves equal care. Consider food-contact suitability, surface finish, product weight, and how the box will travel. Ask for a physical sample, then test it with the actual chocolates. Look for movement, scuffs, loose dividers, and lids that press against the pieces. A sample can reveal what a product image cannot.
This guide will help you compare insert styles, materials, sizes, presentation, and practical costs. It will also point out trade-offs. A beautiful layout may use more space; a compact tray may be harder to load by hand. There is no perfect insert for every assortment. The best choice balances protection, appearance, and a packing process your team can repeat reliably.
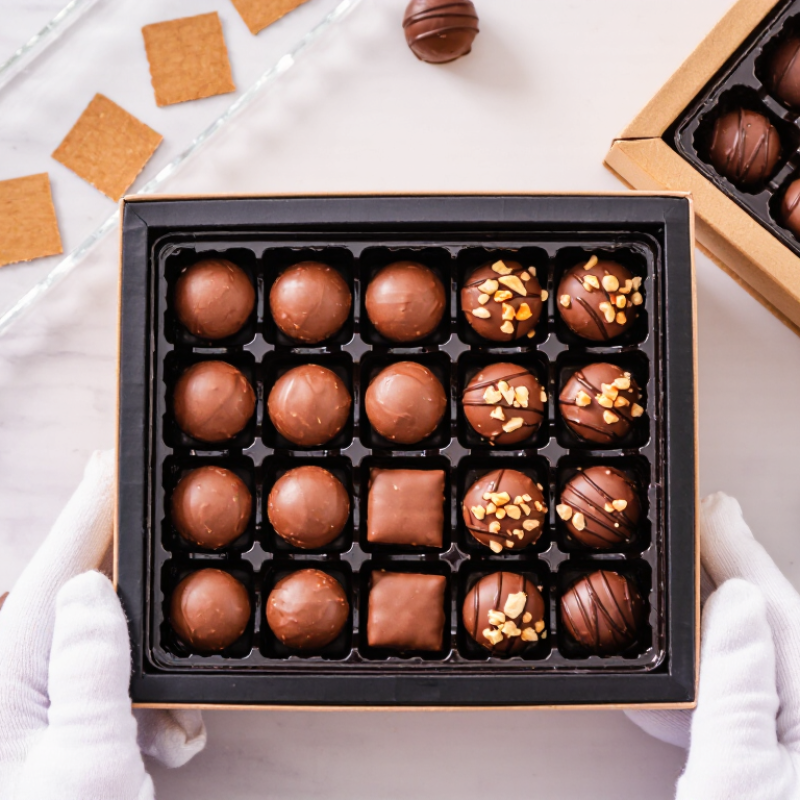
Before choosing a chocolate box, list each piece by shape, size, and weight. A square praline needs a different cavity from a long chocolate bar. Note delicate details, too: piped decorations can catch on tight dividers, while cocoa-dusted surfaces may rub against paper.
Check how the chocolates will travel and be stored. Soft fillings may need a cool, steady environment, and loose pieces can shift during delivery. Inserts should hold each chocolate snugly without pressing its surface. Food-contact suitability matters; ask the packaging supplier for material specifications rather than relying on appearance alone. A white insert can make dark chocolates easy to see, but it may show crumbs quickly.
Measure the widest point of every piece, including toppings. Then compare those measurements with the insert cavities and allow a little room for easy removal. I have found that a tray that looks neat on a screen can feel cramped once chocolates are placed inside. That’s worth checking. Test a filled box by gently tilting it and opening it as a customer would. If pieces slide, stick, or lift out awkwardly, revise the cavity depth or divider spacing before ordering a full run.
Approximate starting dimensions for insert cavities by chocolate type
Cavity dimensions are illustrative planning estimates in millimeters, not product specifications. Measure each chocolate—including any decoration or coating—and allow enough clearance for easy placement and removal before finalizing the insert.
Choose an insert that fits the chocolate, not just the box. Each cavity should hold one piece firmly, with enough clearance to prevent scuffs or snapped corners. For molded chocolates, match the cavity shape to the widest point; for truffles, use a rounded cup that limits rolling. A small amount of movement can become visible after a bumpy delivery. Too-tight cavities can mark delicate coatings.
Material choice matters. Food-contact paperboard and molded fiber can suit lightweight assortments, while PET or recycled PET trays offer clearer, more rigid separation. Check that the material is specified for direct food contact, and test it with the actual chocolate: oils, humidity, and temperature can affect performance. Inserts do not replace temperature control. That part is easy to overlook.
The FAO’s 2019 report, The State of Food and Agriculture, estimated that about 14% of food is lost between harvest and retail worldwide. It does not measure chocolate-box damage, but it shows why preventing avoidable food loss deserves attention.
A practical test is simple: pack a sample, tilt the box, then inspect every piece after simulated shipping. The fit may look perfect on a desk and still fail in transit.
Match each cavity to the chocolate’s widest point, not just its weight. A 25-gram truffle may need more room than a flat 25-gram square because its rounded sides can shift. Measure the piece at its widest and tallest points, then allow slight clearance for easy removal. Too-tight wells scuff delicate coatings; oversized wells let chocolates knock together during handling. A tidy grid can still be wrong. Test the actual chocolates in a sample insert, including any wrapper or cup. Paperboard, molded pulp, and plastic inserts behave differently, so check that the chosen material holds each shape without squeezing it.
Layout should follow the assortment. Use narrow, separate wells for sticks or long pralines, and deeper rounded cavities for domes. For mixed shapes, arrange similar pieces together and keep heavier chocolates from pressing against fragile decorations. The National Confectioners Association’s 2024 State of Treating report notes that 92% of consumers say chocolate and candy are part of celebrations. That makes presentation meaningful, but protection still matters. A beautiful layout that arrives with cracked shells has missed its purpose. Consider how the box will travel, too: shake a packed sample gently and inspect for movement. I would not trust appearance alone; even a well-measured insert can surprise you once the lid closes.
Choose inserts around the chocolates, not the other way around. A snug thermoformed or molded-pulp insert keeps each piece from sliding during delivery. For storage, check that the lid closes without pressing on tall decorations, and leave room for a liner if the chocolates are oily or delicate. Fit matters. A shallow, clear-lid box can show neat rows at a counter, while a rigid, close-fitting lid helps protect them in a bag. The National Confectioners Association’s 2024 State of Treating report found that 92% of consumers say chocolate and candy can be part of a happy, balanced lifestyle. That makes presentation worthwhile, but a pretty lid cannot fix a loose insert.
For transport, test a filled box on a short drive and inspect for shifted pieces, scuffed coatings, or crushed corners. Choose dividers that match each chocolate’s shape; oversized cavities invite movement, while tight ones can damage soft shells. If boxes will be stacked, compare the insert height with the lid depth before ordering. This detail is easy to miss.
Tips: Place one sample box upright, sideways, and flat in a tote. Add a small spacer only if it prevents movement without squeezing the chocolates. Keep a little room for real-world variation.
| Box Style | Common Insert Options | Typical Assortment | Storage Suitability | Display Suitability | Transport Suitability | Best For |
|---|---|---|---|---|---|---|
| Folding carton | Folded paperboard tray or individual paper cups | Small to medium assortments; cavities can be sized to the pieces | Good for lightweight, stackable packs kept dry | Good for printed retail presentation; a window can show the chocolates | Suitable for local handling when packed snugly inside an outer carton | Everyday retail boxes and seasonal assortments |
| Rigid setup box | Paperboard tray, molded pulp tray, or fitted food-contact insert | Small gift assortments with individually separated pieces | Good structure for keeping the assortment organized; store in a cool, dry place | Very good for premium gifting and a neat unboxing experience | Good for careful delivery; use an outer shipper for parcel transport | Gift boxes where presentation and shape retention matter |
| Window carton | Paperboard divider or formed tray that holds each piece in place | Assortments arranged in a single visible layer | Moderate; protect from heat, moisture, and direct sunlight | Excellent for showing the chocolates without opening the box | Moderate; secure the insert and add protective outer packaging for delivery | Counter displays and products where appearance drives selection |
| Drawer-style box | Removable paperboard tray or paper cups | Small to medium assortments arranged in rows | Good when the tray fits closely and prevents pieces from shifting | Very good for layered presentation and controlled access | Moderate to good; prevent the drawer from sliding open during transit | Gift sets and curated collections |
| Corrugated mailer | Fitted paperboard, molded pulp, or other suitable protective tray | Assortments packed with space around the pieces for protective structure | Good for storage and handling when kept dry | Fair; prioritizes protection over shelf display | Very good when correctly sized and packed inside an appropriate shipping setup | Direct-to-customer orders and longer delivery routes |
| Clear plastic box | Formed plastic insert or compartmented tray | Uniform pieces or assortments that benefit from clear separation | Good for keeping pieces visible and contained; avoid high temperatures | Excellent for full product visibility | Good for preventing contact between pieces; add cushioning if the box is shipped | Retail display and assortments where visibility is important |
| Selection note: Match cavity size and depth to the chocolate’s shape, allow enough clearance for easy removal, and confirm that every insert material is suitable for direct or indirect food contact as intended. Chocolate can soften or lose quality in heat, so packaging alone does not replace cool, dry storage or temperature-aware shipping. | ||||||
A well-chosen chocolate box protects each piece and feels easy to open. Start with the insert. If it touches chocolate, ask the supplier for food-contact suitability information and check that it matches your intended use. Keep the documents with your packaging records. A clean-looking tray is not proof of suitability. Measure each chocolate, including decorations, then allow enough room to lift pieces out without smudging them. The fit should feel secure, not tight.
Tips: Test a filled box after chilling it. Tilt it gently. Check whether chocolates shift, and whether condensation softens the insert. Small trials can reveal problems that a product photo misses.
Sustainability needs a practical check, too. Recycled or recyclable materials may be appealing, but coatings, mixed materials, and local collection options affect what can actually be recovered. Ask what the box and insert are made from, and whether they can be separated easily. Then compare that choice with the protection your chocolates need during storage and delivery. There is no perfect option in every case. I would rather admit that trade-off than promise a greener box without checking its full construction. Finally, review the overall fit: box depth, insert layout, closing pressure, and room for a label or protective wrap.
Measure each piece at its widest point, including toppings. A square praline and a long bar need different cavities. Leave room for easy removal.
Choose cavities that hold each piece securely without pressing its surface. Fill the box and tilt it gently to check for movement. Small tests help.
Look for dividers that might catch piped details or rub cocoa-dusted surfaces. A tray can look spacious online but feel cramped in person.
Ask the supplier for material specifications when the insert touches chocolate. Keep the documents with your packaging records. Appearance alone proves little.
Yes. Check whether condensation softens the insert or makes chocolates shift. Open the box as a customer would, too.
Check the box depth, insert layout, and closing pressure. Leave enough room for a label or protective wrap without pressing the chocolates.
Not necessarily. Coatings, mixed materials, and local collection options affect recovery. Check whether the box and insert separate easily.
Test each cavity with a filled box. Pieces should come out without smudging or sticking. I’d still check by hand; measurements miss some things.
Choosing Chocolate Boxes With Inserts starts with understanding the chocolates themselves, including their size, shape, weight, and any delicate decorations. These details help determine how much cushioning and separation each piece needs. Select an insert material that holds chocolates securely without damaging their finish, and choose compartments that fit snugly while still allowing easy placement and removal. A well-planned layout can keep assorted shapes organized and prevent pieces from shifting during handling.
Next, consider how the box will be stored, displayed, and transported. A sturdy box may suit delivery, while an attractive style can make the chocolates appealing for gifting or retail display. Check that the packaging is suitable for contact with food, and consider practical sustainability when choosing materials. The best combination of box and insert protects each chocolate, presents it neatly, and fits the intended use without unnecessary bulk.

Momei Printing